 Nikon DSLR Video Videography News, Tutorials, Reviews, and Information
Note: This article contains affiliate links. By using them when you purchase something, a small portion is returned to us. If you find this content useful, we appreciate you using them to keep this site going.
 Some people love digital camcorders and have yet to jump on the DSLR bandwagon – which is fine if that’s what you and your clients prefer. However, when it comes time to upgrade, many are ditching the traditional video camera and going with a video-capable DSLR. The switch can be daunting because of certain limitations of DSLRs like lack of traditional XLR audio inputs, record-length limits of 15 or 20 minutes.
We hope this guide will help the beginner DSLR wedding videographer or someone with a lot of experience filming weddings that is interested in switching to DSLRs. Also, this is by no means the only way to do it – but it’s how we do it and it works well.
Capturing Ceremony Audio – “House Audio”
If there’s one piece of audio that a wedding videographer shouldn’t screw up, it’s the ceremony – specifically the vows.
 Typically, the wedding venue, officiant, DJ, Band, will be providing some type of audio amplification so the congregation/guests can hear what’s going on. The first thing we do is meet with whoever has access to that system and see if we can get a line-out to record. We have an entire audio box of adapters and cords (RCA, XLR, 1/4inch) that we can splice in to pretty much any audio setup we encounter. We have splitters just in case there are no extra outputs for us (and we can splice into the main out), but we’ve also never had to do that.
DJs and Bands are the most common providers for ceremony amplification and the easiest to work with. While most churches have a mic for the priest/rabbi, many of the systems are antiquated, as are the elderly helpers, so don’t be surprised if they won’t let you near the audio master control. We’ve been in some newer churches that provide multiple audio professionals in a sound booth – a true blessing but a rare occurrence indeed.
90% of the time house audio will be from a wireless mic on the officiant, 10% it will be a mic on a stand. A stand mic is not ideal, since most officiants move around and/or change the direction they’re speaking at least a little bit, and when the mic doesn’t follow their every move (a lavalier mic does a much better job at this) the levels go all over the place and make your job more difficult in post-production audio work).
Capturing Ceremony Audio – “Your Audio”
While we always try to plug into the house audio feed, we treat that feed as a bonus/backup to our own audio recording system that we have complete control of. Quality audio is so important to making good video that even in our early stages we used a relatively high-end, Sennheiser G3 wireless lavalier mic. $700-$800 seems like a lot, but they can also be rented in a lot of places. Precision Camera in Austin rents these for $20/day – so if you’re shooting a wedding, there’s really no excuse not to use quality audio gear – even if you’re on a budget.
We only have one of these mics and we place it on the groom about 10 minutes before the ceremony and remove it immediately after the ceremony to avoid it being in too many pictures.
Recording Ceremony Audio
Once we have the house feed and our own feed, we use either a Zoom H4N or Zoom H1
. Because remembering irrelevant product numbers can be annoying and confusing to those not making the purchases (i.e. video assistants), we end up calling these the “Zoom” and the “Baby Zoom”.

While not without their issues, we’ve found zoom products to be as reliable as anything else. Keep in mind that no audio capturing device should be relied on 100%. Repetitive systems and secondary audio sources are the best insurance policies. We’ve even begun daisy-chaining a Baby Zoom to our Zoom since we’ve occasionally got a “Card Write Error” when hitting stop after a ceremony.
Luckily, we had backup audio both times – but if we didn’t – that would be an extremely difficult conversation to have with the bride and groom. “Sorry my equipment failed, but I don’t have audio of you saying ‘I do’,” is never going to be easy. Do the right thing and get a small, $100 recorder and use it as your insurance policy. You may never have a problem, but it’s well worth $100 to (most likely) never have to tell a bride and groom that you blew it. If you’re being paid as a professional, it’s not your equipment that gets the blame, it’s you.

Ceremony Audio – “Extras”
Readings: Generally, this will be through a stand-mic or hand-held wireless mic and through the house system. If there are a lot of readings, you may consider the daisy-chain insurance policy on your house recorder described above since there will be only 1 mic picking up this audio with any degree of usable proximity.
String Quartet: If you don’t have enough Baby Zooms in your bag to place one near the quartet, the iPhone with a wind guard (and even without) makes a pretty decent recording. We’ve run out of recorders before and used the iPhone for strings on several weddings and it worked well. We use a program called iExplorer in trial mode to grab the .mp4 file to drop into our timeline.
On Camera Audio: The only time we use on-camera audio is for crowd reaction (e.g. a chuckle after a funny line, or applause after the first kiss). If the venue is particularly quiet (lots of carpet), we may bring in a little of the camera audio just to provide some ambient sound – but generally 15-20 db below the recorded level.
Ceremony Video – Time Limits with DSLR
Yes, there are time limits when filming with DSLRs, but this only adds about 5 minutes to your workflow and there are easy ways around it.
For starters, you need to be using at least 2 cameras so the filming can overlap. If you’re saying, “Well I only use one camera for the ceremony and I need it to be non-stop,” then you better stick with the camcorder and low-budget weddings. One continuous angle of a ceremony sounds excruciating to watch.
Staggering Recordings: It will be necessary to communicate with the other cameraman before you start/stop recording to make sure they have a clear shot and will hold that shot for the 5 seconds it will take you to start/stop. We use two-way radios to get each other’s attention. It’s normally too quiet to talk, so we just tap the talk button to get the other’s attention and then use the hand signal for ‘break’ (like you’re breaking a stick in two), and the other knows to get situated and/or give the thumbs up when it’s OK. We try to do this 2-3 minutes before the max recording time.
In the off-chance that you both break at the same time, it’s not the end of the world, but you’ll need to cover it up with b-roll, which may be awkward in the middle of the ceremony.
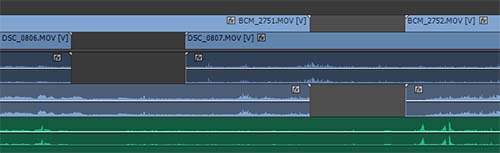
Staggering also allows you to align the audio in post-production.
Aligning Audio in Post Production
There are programs that help you align audio in post, but we use the old-fashioned (cheap) method of lining up wave forms. It doesn’t take too long and is more accurate.
We start with one track as a base (normally our own audio captured from the groom) then align each other track with that one. It doesn’t take long (10 minutes?) even for 2 or 3 cameras and 3-5 audio sources.
We use Premiere Pro CC to edit, and we can zoom in and expand the wave-forms to make this process easier. Also, if you mute all other tracks besides the one you’re working with and the base track, it will sound less overwhelming.
Ceremony Audio Summary (works for speeches too):
House Mic on Officiant: Record on Zoom H4N/Zoom H1
, or both if critical
Lavalier Mic on Groom: Record on Zoom H4N/Zoom H1
, or both if no house mic is available
Mic on Strings/Musicians: Record on Zoom H1, iPhone, or other small recorder
On-Camera Mic: Only use for crowd reaction and/or ambient sound if needed.
Questions? Let us know and we’ll add more info!